Parts of Hearing Aids

Knowing the parts of your hearing aid can be beneficial for proper care and maintenance.  It can also help you describe issues to your audiologist so they can be resolved more accurately.  We’ll take a look at some important parts of the various styles of hearing aids.

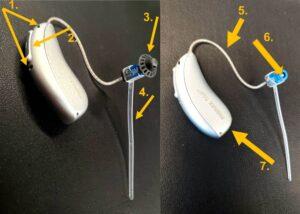
Receiver-in-the-Canal (RIC) Hearing Aids

diagram of the structure of a RIC Hearing Aid

  1. Microphones – where sound is picked up in the environment to be processed by the hearing aid. Microphones should be brushed daily to ensure they do not get clogged with debris.
  2. Button – used to change volume or programs. It can be a single button or a dual rocker switch. Not all devices have a button.  The function will vary depending on your device and the settings chosen by you and your audiologist.  Consult your audiologist to discuss your button settings.
  3. Dome – rubber tip on the end of the receiver. This part goes in the ear and will be of varying sizes determined by your audiologist and based on hearing needs and ear canal size.
  4. Retention tail – plastic tail that helps anchor the hearing aid in the ear.
  5. Receiver – speaker portion of the hearing aid. It consists of a wire plugged into the hearing aid that leads down to the speaker in the ear.
  6. Wax trap (aka wax guard or wax filter) – white filter that keeps wax from getting into the electronics. When clogged, the hearing aid will sound weak or not produce any sound. This indicates that the wax trap needs to be changed.  Consult your audiologist for instructions on changing the wax trap.
  7. (Rechargeable device, pictured) Charging contacts – where the hearing aid makes contact with the charger in rechargeable devices. These should be kept clear of debris to ensure good charging contact.
  8. (Non-rechargeable device, not pictured) Battery door – where a new battery is inserted in non-rechargeable devices. The door is opened by pulling down on the notch.

Behind-the-Ear (BTE) Hearing Aids

diagram of a behind-the-ear hearing aid

  1. Tone hook – plastic hook that couples the earmold to the hearing aid.
  2. Tubing – pliable plastic piece that connects the tone hook to the earmold and allows sound into the ear. The tubing should be kept clear of wax and debris using the pick end of your brush. After approximately 6 months, the tubing will stiffen and need to be replaced.  Consult your audiologist for tubing changes.
  3. Earmold – custom shaped portion of the hearing aid that inserts into the ear. It can be made of either hard acrylic or soft silicone, depending on your hearing needs. The earmold should be kept clean by wiping with a soft cloth and brushing/picking debris out of the two holes.  The two holes are:     3.a Vent – channel that runs through the lower part of the earmold to allow low frequency sounds to escape and air to flow to the ear.  The size of the vent will depend on your hearing levels.

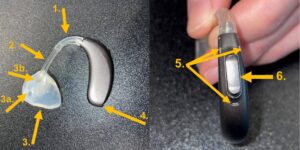
    3b. Sound bore – channel in the earmold into which the tubing is inserted.  This is where the sound comes out.

  4. (Non-rechargeable device, pictured) Battery door – where a new battery is inserted in non-rechargeable devices. The door is opened by pulling out on the notch.
  5. (Rechargeable device, not pictured) Charging contacts – where the hearing aid makes contact with the charger in rechargeable devices. These should be kept clear of debris to ensure good charging contact.
  6. Microphones – where sound is picked up in the environment to be processed by the hearing aid. Microphones should be brushed daily to ensure they do not get clogged with debris.
  7. Button – used to change volume or programs. The shape of the button can vary. Not all devices have a button.  The function will vary depending on your device and the settings chosen by you and your audiologist.  Consult your audiologist to discuss your button settings.

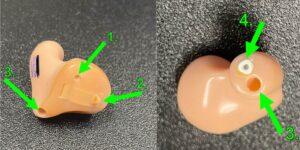
In-the-Ear (ITE) or In-the-Canal (ITC) Hearing Aids  

diagram of a In-the-ear (ITE) or In-the-Canal (ITC) Hearing aids

  1. Microphones – where sound is picked up in the environment to be processed by the hearing aid. Microphones should be brushed daily to ensure they do not get clogged with debris. Periodically, your audiologist may need to change the filter over the microphone.
  2. Battery door – where a new battery is inserted in non-rechargeable devices. The door is opened by pulling out on the notch.
  3. Vent – channel that runs through the lower part of the hearing aid to allow low frequency sounds to escape and air to flow to the ear. The size of the vent will depend on your hearing levels. The vent should be kept clear of debris with the pick end of your brush.  The second image shows the vent from the other side.
  4. Wax trap (aka wax guards or wax filters) – white filter that keeps wax from getting into the electronics. When clogged, the hearing aid will sound weak or not produce any sound. This indicates that the wax trap needs to be changed.  Consult your audiologist for instructions on changing the wax trap.
  5. Button (not pictured) – used to change volume or programs.  Not all devices have a button.  The function will vary depending on your device and the settings chosen by you and your audiologist.  Consult your audiologist to discuss your button settings and location.

Questions?

If you have any questions regarding the parts of your hearing aids, contact your audiologist at 405-548-4300.

Newsletter Signup

Name